

Word offers us a series of very useful tools to work comfortably. One of them is the recent documents list, which allows us to quickly open those files we have been working with lately in one click. Although in some cases it can be a bit annoying, so we will have to deactivate it or eliminate the results it shows us.
When we work with Word and we need several sessions or days to finish the same document, practically without realizing it, we use the recent file history, because in a single click it opens the document we need. When we are extremely organized, we may need to open 5 or 6 folders to get to a Word document, with the list of latest documents we will save time.
However, the opposite can also happen. Instead of working with the same file for days, or weeks, we might open 20 different documents in one morning and the last document history does nothing but annoy, because you try to go to it to open a document and it just messes with us and that we lose time. Therefore, in some circumstances it is interesting to know how to remove files from recent document history or customize that list.
Delete files individually
If you usually work with the list of recently used files you may like to have it sorted and that it only shows us some type of files or only the most useful ones, for this we can delete from the history only the documents we choose.
In Word for Microsoft 365
If we work with the latest version of Word, which is integrated into Microsoft 365, these are the steps we will follow To delete a file from the recently used list:
- We open Word as we normally do.
- We click on File in the top menu.
- We select To open.
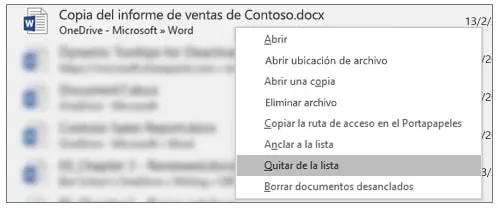
- In the list of recently used files we choose the one we want to delete by doing right click mouse over it.
- Click on Remove from the list (We must be very careful not to press Delete file, we would lose it).
In Office 2010
If, on the contrary, we use any of the classic versions of Word As it is the one that is integrated in Microsoft Office 2010, the process to delete files from the list of recently used documents manually is like this:
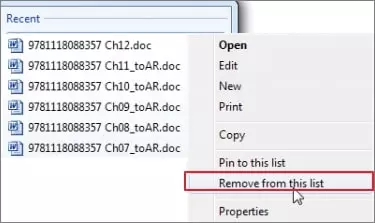
- We click on File in the top menu bar.
- We will click on Recent.
- We click with the right mouse button and click on Delete undocked items.
- We will press again on Yes to confirm the action.
Disable recent document list
Both the Microsoft operating system and most of the applications developed by themselves have the latest documents tool, but if you are one of those who never use it, it may occupy a space that you want to free up, therefore, to disable recent files list we will have to do what we indicate below.
In Word
For delete recent documents list we will do this:
- We click on File in the top menu bar.
- Then we will click on the button Choices from the bottom of the left side menu bar.
- We will select the section Advanced also in the left sidebar.
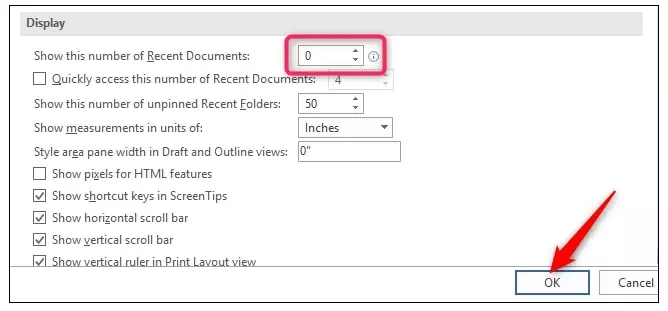
- In the central screen we will scroll down to the section Show.
- In the Show this number of recent documents field we will indicate “0”.
- Click on To accept to save the changes.
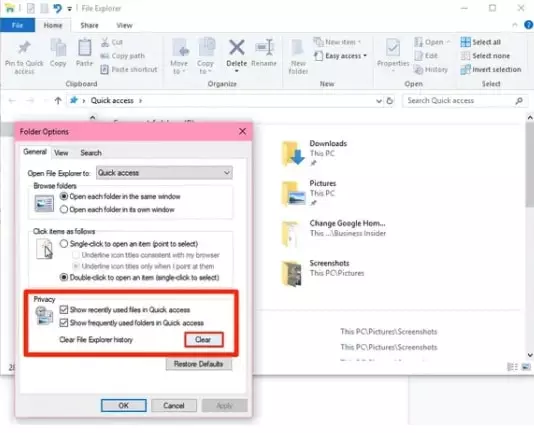
On Windows 10
The operating system itself also has a history of recently used files and, in the same way as in Word, we can manage this list as follows:
- We open the File Browser.
- In the top menu bar we click on File.
- Click on Folder and search options.
- Inside the tab general and in the section Privacy we can activate or deactivate the history of recent documents or click on the button Clean up to delete them all in one click.
Customize Recent Files List
The history of last documents can be customized to use it to our advantage, we can anchor some files, choose how many documents to show, etc.
Pin a file
For fix a document In the recent history we will do it differently if we use Word for Microsoft 365 or Microsoft Word 2010.
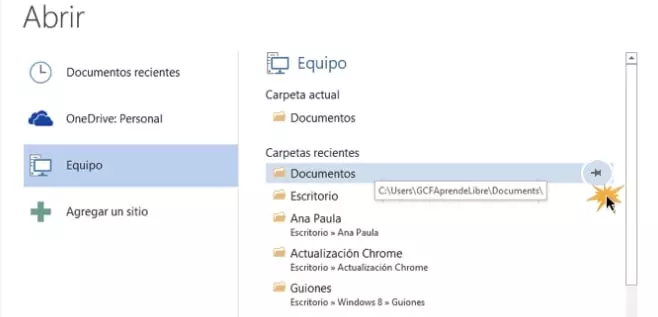
- Microsoft 365
To anchor a file to the history of recently used documents we will go to the list in File / Open and we will click on the gray thumbtack on the right side of each document. These files will be displayed at the top of the list while the non-anchored ones will continue to be placed in chronological order. To undock it, simply press the pin again.
- Microsoft Office 2010
To anchor a file to the recent history we will have to access it by going to File / Recent. In this case we can click on the thumbtack on the right side of each file or right-click and select Pin to list. In the same way, to unpin it, we will only have to click on the pin again.
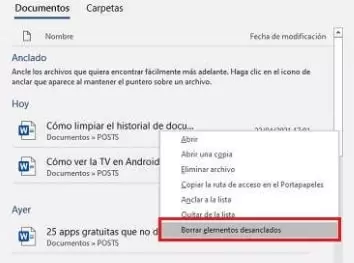
Delete unpinned files
Once we have anchored the recent files that we most need to have in view, we may be interested delete all other documents. The procedure is the same for Microsoft 365 or Office 2010 users.
To do this we will have to go to File in the main menu and click To open. Then we will click with the right mouse button on any element and click on Remove undocked items. We will click Yes to confirm.
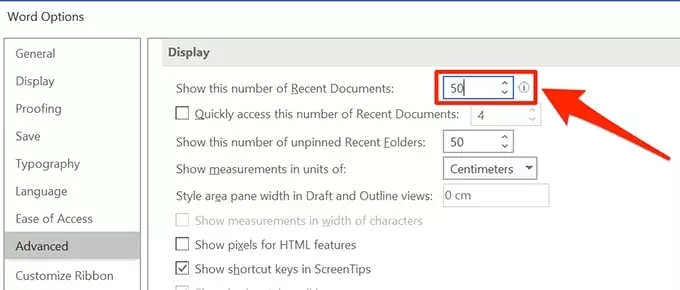
Modify number of files
Recent files history shows a specified number of documents. However, we can modify the number of files we want to see on this list. According to our customs and our way of working, we may be interested in a short list to see a few files or the most extensive list possible. This process is valid for Microsoft 365 and also for Microsoft Office 2010.
For choose how many files we want to see In the history of recent documents we will follow these steps:
- We’ll go to File / Options / Advanced.
- In the section Show we will see the field Show this number of recent documents.
- We indicate the number of files we want to see.
Synchronization with Microsoft account
In the latest versions of Microsoft Office, or in the current Microsoft 365, the history of recently used files is synced with our Microsoft account. In this way, we will see all the documents used recently even if we use Word on our own computers that are connected to our account.
In these cases it may happen that old files appear in our list of recent documents. This happens when a device connects to the Internet after it has been turned off for a long time. It synchronizes with the list and shows us old files in the recent history. The only way to avoid this is to delete them manually as we have indicated above.
The post Manage and Delete Recent Files List in Word appeared first on ADSLZone.


